EveryGUI Chameleon
EveryGUI Chameleon is more straight-forward than other GUIs, but like all GUIs it still has a slight learning curve. The difference is once you learn EveryGUI, you have also learned all the programs and commands it supports.
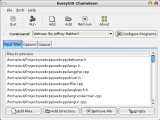
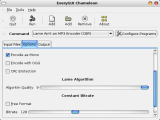
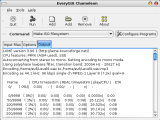
The main window consists of a menubar, toolbar, a program/command selection and 3 tabs: Input files, Options, and Output. The menubar and toolbar are pretty much straight forward, as half of which corresponds directly with the Input Files tab. Let's take a look at the 3 tabs now.
*You can also use the Options tab to take single input files, if it's the type of command that doesn't typically require having the user operate on a whole batch of files at once. Technically it can work with both, but this is really up to how the EveryGUI Definition was designed for the command.
So, the basic steps of running EveryGUI are:
If you eventualy want to extend EveryGUI Chameleon to add other programs or custom commands, or even use it as a tools list by binding whole commands to each single button, you will need to learn EveryGUI Designer - which is a cakewalk compared to programming you own GUIs.
The main window consists of a menubar, toolbar, a program/command selection and 3 tabs: Input files, Options, and Output. The menubar and toolbar are pretty much straight forward, as half of which corresponds directly with the Input Files tab. Let's take a look at the 3 tabs now.
*You can also use the Options tab to take single input files, if it's the type of command that doesn't typically require having the user operate on a whole batch of files at once. Technically it can work with both, but this is really up to how the EveryGUI Definition was designed for the command.
So, the basic steps of running EveryGUI are:
- Select the command/program you want to run
- Select input files (if any are required)
- Select or input the required options (requirements depends on the command)
- Click the Run button from the toolbar
- Save as script for later use (optional, but very useful if you are running a commonly used command with several input files)
If you eventualy want to extend EveryGUI Chameleon to add other programs or custom commands, or even use it as a tools list by binding whole commands to each single button, you will need to learn EveryGUI Designer - which is a cakewalk compared to programming you own GUIs.
EveryGUI Designer
So, you've mastered EveryGUI Chameleon, but now you want to get more out of it by adding support for other commands. You'll be pleasantly surprised how high-level EveryGUI Designer is for building GUI elements - it's all visual and you don't even have to write a single line of code to get it working.
Just by clicking around and reading tooltips you can probably figure out most of EveryGUI Designer, but there are still some things about understanding building command formulas that need to be further explained. For the sake of clarity, let's start from the beginning.
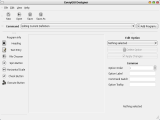
Let's take a closer look at the buttons in the option creation pane:
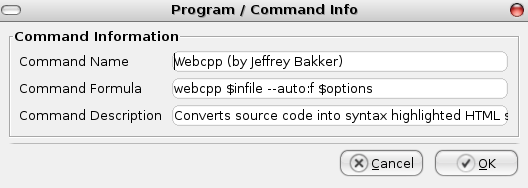
The formula is the real important thing here, and it is important you understand this one. The formula is the actual command to run the program, including option rules. You may use the EveryGUI variables "$options" and "$infile" in your formula. The $options variable contains any options selected/filled in the Options tab in EveryGUI (ordered in groups, explained later). And $infile represents the files chosen in the input files tab, if any (it's perfectly fine not to use $infile for it is optional because $options may also contain an input file). The order in which to use $options and $infile is up to the program/command you are using. Webcpp takes the input file first:
webcpp $infile $options
The formula is pretty easy to find out for the most part - all you need to do is look up the usage of the command by calling it with the "-h" or "--help" parameter. For example if you called `tar --help` it will tell you to use `tar [OPTION...] [FILE]...` which you can easily translate to EveryGUI syntax like so:
tar $options $infile
Also note that you can manually add options in the formula if you want them to be mandatory:
tar -xzv $options -f $infile
The "-xzv" would force extract using gzip and verbose regardless if they were chosen as an option from $options, and "-f" tells the next switch is going to be the input file. Since you can add switches manually in EveryGUI formulas, you can do stuff like piping 2 or more programs together (although only one of them can use $options):
webcpp $infile --pipe -l -m -a | tidy $options
Well, that's it for formulas - I hope these examples gave you some neat ideas.
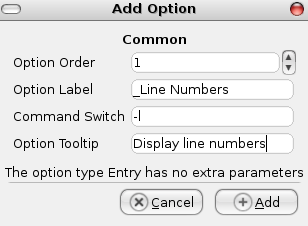
The order field is the order group in which the option is passed when the command is called. It can be from 1-3. This is to make sure that a certain option gets passed before or after other options, as some commands or programs have a few options that require a certain order. The option order and the program formula are two things that really make EveryGUI compatible with almost any command.
The label field is the label for the option. If the option's widget doesn't have a built-in label (like checkbutton does), then EveryGUI will create a label widget with label and place it beside the option widget (like entry or file chooser).
The switch field is the option (or "switch") as it would appear in the command line (eg. "-h" or "--help"). Note that if you are using an option that takes user input (pretty much anything except the check button), make sure to put a " " (space) or "=" sign after, whatever the program uses (unless it requires the input directly after the switch, but the standard seems to be a space). For example...
Command line: "-o <outfile>" EveryGUI: "-o " (notice the space)
Command line: "--file=<file>" EveryGUI: "--file="
Notice that you only have to use the switch, not any variable like "<outfile>". This is because EveryGUI only needs the name of the switch as it automatically adds the variable from the user's input upon execution.
If your option widget is a "Exectue Button", then switch has a totally different purpose. In this case, instead of entering a switch you can enter a whole command. This command will exectue when the button is pressed!
The tooltip field lets you add tooltips to your option's widget, that appears when the mouse goes over it. This should be a descriptive comment about what the option does. Not all widgets can show tooltips, however (eg. Heading, Horizontal Scale and File Chooser). Instead of a tooltip for the file chooser, if you give it a tooltip it will be the title of the file chooser dialog.
Well, that's pretty much it...that's all you need to know how to create EveryGUI Definition (.egd) files. If you make .egd files that you think others will find useful, you may submit them to be included in future releases of EveryGUI. This is encouraged as contibutions is what will make EveryGUI more powerful "out of the box".
Just by clicking around and reading tooltips you can probably figure out most of EveryGUI Designer, but there are still some things about understanding building command formulas that need to be further explained. For the sake of clarity, let's start from the beginning.
Interface Overview
The EveryGUI Designer consists of a menubar, toolbar, a command selection, and 3 panes. The menubar and toolbar are basically for creating new, opening, and saving definition files. The command selection combo box lets you open up the selected command for editing. The 3 panes are (from left to right) the option creation pane, the option preview pane, and the option selection and editing pane.
Option Creation Pane
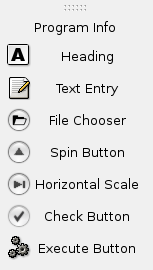
The option creation pane is very similar to something you'd see in QT Designer, Glade or Gazpacho, yet it not only adds widgets, but option information that is binded to the widget as well. It doesn't give you half as much choice of widgets as other interface designers do, yet it rather focuses on widgets that are commonly used to represent options in a command, which is all you need because the rest of EveryGUI Chameleon is already designed to handle them.Let's take a closer look at the buttons in the option creation pane:
 |
|
Program Info
Program info consists of 3 fields: name, formula, and description. The name doesn't have to be exact as the program or command, but rather whatever you want to call it, eg. "List Directory" or "Backup my files". The description is a description of what the program or command is supposed to do.
The formula is the real important thing here, and it is important you understand this one. The formula is the actual command to run the program, including option rules. You may use the EveryGUI variables "$options" and "$infile" in your formula. The $options variable contains any options selected/filled in the Options tab in EveryGUI (ordered in groups, explained later). And $infile represents the files chosen in the input files tab, if any (it's perfectly fine not to use $infile for it is optional because $options may also contain an input file). The order in which to use $options and $infile is up to the program/command you are using. Webcpp takes the input file first:
webcpp $infile $options
The formula is pretty easy to find out for the most part - all you need to do is look up the usage of the command by calling it with the "-h" or "--help" parameter. For example if you called `tar --help` it will tell you to use `tar [OPTION...] [FILE]...` which you can easily translate to EveryGUI syntax like so:
tar $options $infile
Also note that you can manually add options in the formula if you want them to be mandatory:
tar -xzv $options -f $infile
The "-xzv" would force extract using gzip and verbose regardless if they were chosen as an option from $options, and "-f" tells the next switch is going to be the input file. Since you can add switches manually in EveryGUI formulas, you can do stuff like piping 2 or more programs together (although only one of them can use $options):
webcpp $infile --pipe -l -m -a | tidy $options
Well, that's it for formulas - I hope these examples gave you some neat ideas.
Creating Options
All option types (except for heading) share the same common set of fields: order, label, switch, tooltip.
The order field is the order group in which the option is passed when the command is called. It can be from 1-3. This is to make sure that a certain option gets passed before or after other options, as some commands or programs have a few options that require a certain order. The option order and the program formula are two things that really make EveryGUI compatible with almost any command.
The label field is the label for the option. If the option's widget doesn't have a built-in label (like checkbutton does), then EveryGUI will create a label widget with label and place it beside the option widget (like entry or file chooser).
The switch field is the option (or "switch") as it would appear in the command line (eg. "-h" or "--help"). Note that if you are using an option that takes user input (pretty much anything except the check button), make sure to put a " " (space) or "=" sign after, whatever the program uses (unless it requires the input directly after the switch, but the standard seems to be a space). For example...
Command line: "-o <outfile>" EveryGUI: "-o " (notice the space)
Command line: "--file=<file>" EveryGUI: "--file="
Notice that you only have to use the switch, not any variable like "<outfile>". This is because EveryGUI only needs the name of the switch as it automatically adds the variable from the user's input upon execution.
If your option widget is a "Exectue Button", then switch has a totally different purpose. In this case, instead of entering a switch you can enter a whole command. This command will exectue when the button is pressed!
The tooltip field lets you add tooltips to your option's widget, that appears when the mouse goes over it. This should be a descriptive comment about what the option does. Not all widgets can show tooltips, however (eg. Heading, Horizontal Scale and File Chooser). Instead of a tooltip for the file chooser, if you give it a tooltip it will be the title of the file chooser dialog.
Option Preview Pane
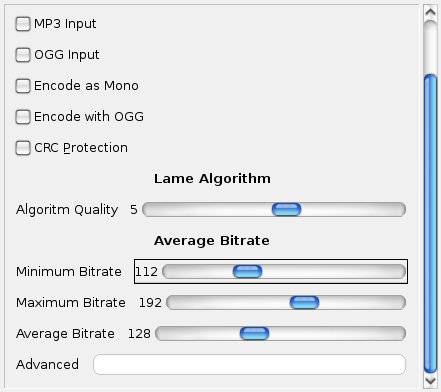
This is a preview of how the options tab in EveryGUI Chameleon will look like. When an option is added, its widget will be shown here. When an option is selected for editing, its widget will have a box around it, so you can see which option you're editing. When edit changes are applied to the option, the widget will update.
Option Edit Pane
|
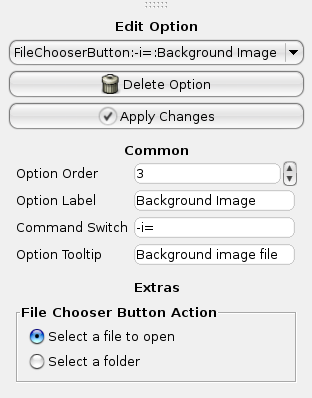
When you select an option name from the "Edit Option" combo box, you will be able to edit its values, much like how you added them (in fact, the edit pane uses the same editing controls as the add option dialog). When you are finished editing an option, you may click "Apply Changes" to update it. You may also delete an option and its widget by clicking the "Delete Option" button.
The eidt pane may have extra fields to edit widget-specific information, depending on the type of option you currently have selected. |
Conclusion
When saving, the default folder selected is the egconfig directory. You must save it in here, if you want EveryGUI Chameleon to be able to load the command.Well, that's pretty much it...that's all you need to know how to create EveryGUI Definition (.egd) files. If you make .egd files that you think others will find useful, you may submit them to be included in future releases of EveryGUI. This is encouraged as contibutions is what will make EveryGUI more powerful "out of the box".

